

Previously in one of the publications, we already talked about the tiles for the bathroom walls. As you already know, ceramic tile bathroom wall decoration has many advantages over finishing methods such as painting the walls or wallpapering.
The tile has excellent hygienic properties. It is easy to clean and is not afraid of detergents. It does not support the spread of mold and mildew.
Ceramic tiles are not afraid of high temperatures and humidity. Even a direct hit of water on the tile walls will have no consequences.
The tile has high decorative qualities, so you can always choose the tile of the desired color and pattern to repair.
Also, the advantages of the tile include its durability. For many years, the tiles have been able to maintain their original appearance. Sometimes you just need to wipe it with a damp cloth and soapy water to remove the dust.
As you can see, there are quite a few advantages of ceramic tiles over other types of finishing materials. But there is also a major drawback. Tiling requires some experience in performing such work and is the most expensive and time-consuming type of bathroom wall decoration.
How to tile the bathroom walls step by step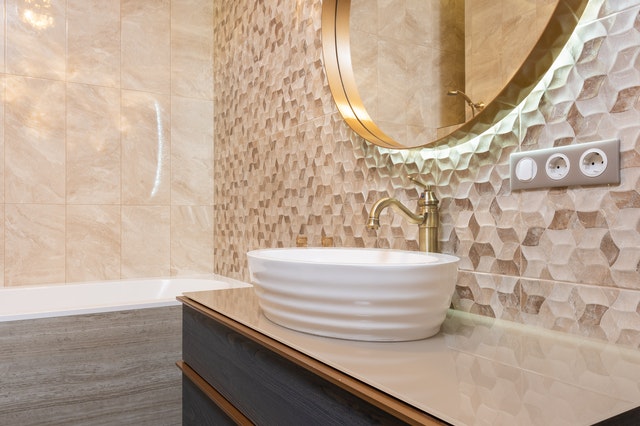
Before you proceed directly to gluing the tiles, you need to properly prepare the walls.
As a general rule, wall preparation comes down to removing old paint, caulking, and applying a primer to better adhere the tile adhesive to the wall surface.
Old paint can be removed in a number of ways. To do this, you can use special chemical or mechanical methods: a grinder, a perforator, an electric drill. You can read more about surface cleaning in the wall painting article.
After cleaning the old paint surface, cracks and chips should be repaired, if any, in the brick.
Cracks can be repaired with putty, carefully leveling with a putty knife when necessary.
Only after the putty is completely dry, you can proceed to prime the walls.
Tile adhesive preparation
After the surface of the walls is prepared for gluing ceramic tiles, you can proceed to prepare the glue.
For this, dry mixtures are used, specially designed for the preparation of a solution on which the tiles are glued. When buying a dry mix, make sure it is suitable for making tile adhesive in a humid room.
The ratio of dry mix to water, as a rule, is indicated on the package. In a suitable size container, mix the dry mixture with water using a mixer until a homogeneous paste-like consistency is obtained.
Tile design
Before you start laying tiles, you need to decide on the layout of the tiles. As a general rule, the walls of the bathroom are adorned with rectangular tiles, with their long side parallel to the walls. This orientation of the tiles will make the ceilings visually higher, which is important for decorating or renovating a bathroom and toilet in a small modern apartment.
But you can choose the tile orientation you like best. Also, you need to consider decorative inserts, if you will use them for wall decoration, as well as edging.
Below is a video on how to properly lay tiles when decorating walls with tiles:
How to lay the first row of tiles
As a rule of thumb, the first row of tiles begins to be laid not from the floor, but from a flat horizontal line at the height of the second or third row of tiles. This is due to the fact that the floor does not always have an absolutely flat surface and when laying the first row along the floor line, the additional rows may not be uniform.
In addition, the sewer pipes are often located on the floor, which makes the arrangement of the first row difficult, even with a perfectly horizontal surface.
Therefore, for the first row, you need to mark the wall with a hydraulic level and, according to the mark, strengthen the metal profile for drywall or other flat guide support along which the first row will be laid. of tiles.
It is advisable to lay the first row at such a height that there is an even number of rows of tiles from it to the ceiling without trimming. If you plan to have a false ceiling made of PVC panels, stretch ceiling, or aluminum slats, then this point will not be as important as the top edge of the tile will be hidden behind a false ceiling.
Oftentimes, the work begins with the foundation for the first row on the side of the bathtub, adjacent to the wall. In this case, the side of the bathtub is sealed with adhesive tape so as not to damage it during the laying of the tiles and to start applying glue to the wall.
The glue is applied with a straight trowel (trowel) in a small area, enough to lay 2-3 tiles. The thickness of the tile adhesive layer should be 5-7mm. The applied layer is stretched with a trowel comb.
After that, a small amount of tile adhesive is applied with a spatula directly on the tile and also combed over it to give it roughness and better adhesion.
The tile is pressed hard into the layer of adhesive applied to the wall. After that, using a level, you need to check the horizontality and verticality of the first tile, since then all the following tiles will be lined up on it.
To maintain the same spacing between the tiles when laying them on the wall, special crosses and inserts should be used. Cross stitches are usually 1.5mm thick. This is enough to get a beautiful, even seam.
If the entire tile does not fit into the corners, then it must be cut. To do this, use a special tool called a tile cutter.
If you don’t have a tile cutter, you can cut the tile without one. If you need to trim the curb, it is best to do it with a grinder.
Laying the second row of tiles and the next ones
The following rows are arranged relative to the first row. Compliance with horizontal and verticality must be constantly controlled using a level.
Where the pipes emerge from the wall, holes of the required diameter are cut into the tiles with the help of a diamond crown.
The glue that sticks out of the joints when the tiles are pressed should be removed quickly with a putty knife or a damp cloth before it hardens.
Once all the tile rows have been laid, you can begin grouting the joints.
Grout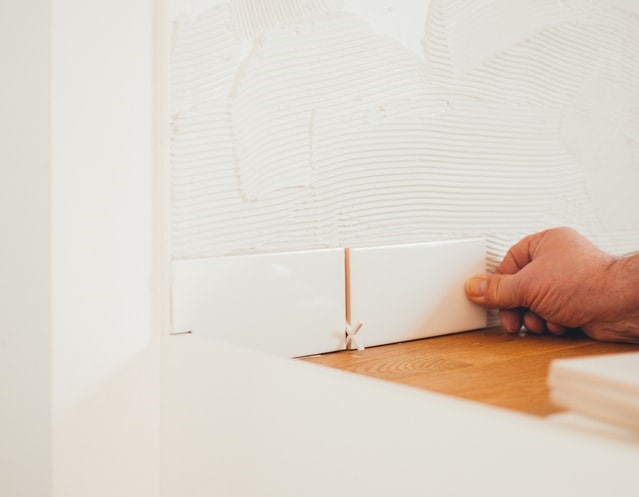
Grout is made from a dry chalk-based mix with a binder.
The grout is diluted with water to a creamy consistency and carefully applied to the tile joints with a putty knife.
You can create a beautiful grout at the joints with a special trowel
After all the joints are filled with grout, you must remove the excess mixture with a damp cloth.
As you can see, there are no special secrets to tile bathroom walls. It is enough to carefully make the markings and observe the laying technology, monitoring the progress of work with the help of a level, and you will be successful!
You Can Visualize your FloorTiles, Wall Tiles, Bathroom Tiles, and Kitchen Tiles using a Tiles Visualizer. Tiles Visualizer is the best way to visualize your Tiles Projects.